
在本地搭建一个ethereum的私有网络
Setting Up A Private Blockchain
上一期教程我们已经完成了以太坊环境的搭建和geth客户端的安装,这一期我们使用geth搭建第一个ethereum的私有节点。在上一期的环境下,仍然先进入到管理员用户,然后配置geth环境:
su root

export  PATH=<go-ethereum存放的文件夹>/build/bin
一条区块链的运行首先需要一个初始块,我们需要对我们私有网络的区块链进行初始化。
以太坊的创世块信息储存在一个json文件中,实际上目前几乎所有区块链信息都可以用json文件储存。
这个是我的初始块信息
{
"config": {
"chainId": 2019,
"homesteadBlock": 0,
"eip155Block": 0,
"eip158Block": 0
},
"alloc" : {},
"coinbase" : "0x0000000000000000000000000000000000000000",
"difficulty" : "0x400",
"extraData" : "",
"gasLimit" : "0x2fefd8",
"nonce" : "0x0000000000000042",
"mixhash" : "0x0000000000000000000000000000000000000000000000000000000000000000",
"parentHash" : "0x0000000000000000000000000000000000000000000000000000000000000000",
"timestamp" : "0x00"
}
- 上面参数的意思分别是
- nonce用于挖矿的随机数
- timestamp初始块的时间戳设置为0
- parentHash上一个区块的hash,创世块因为没有前驱所以为0
- mixHash 上一个区块的一部分生成的256位的哈希证明,与nonce相结合用于挖矿
- extraData附加信息
- gasLimit GAS的消耗总量限制,燃料上限
- difficulty 计算难度-前多少位为0
- coinbase 矿工帐号
- alloc 创世中初始账户资产配置(允许定义预先填充的钱包列表)
- config是定义链配置,影响共识协议
- chainid是链的id号
官方解释会更加权威一些,建议大家直接看英文的参数介绍,也有利于理解区块链的结构,内容不想看可以直接跳过–>
-----------------------------------------------Genesis block Explanation------------------------------------------------------


mixhash A 256-bit hash which proves, combined with the nonce, that a sufficient amount of computation has been carried out on this block: the Proof-of-Work (PoW). The combination of nonce and mixhash must satisfy a mathematical condition described in the Yellowpaper, 4.3.4. Block Header Validity, (44). It allows to verify that the Block has really been cryptographically mined, thus, from this aspect, is valid.


nonce A 64-bit hash, which proves, combined with the mix-hash, that a sufficient amount of computation has been carried out on this block: the Proof-of-Work (PoW). The combination of nonce and mixhash must satisfy a mathematical condition described in the Yellowpaper, 4.3.4. Block Header Validity, (44), and allows to verify that the Block has really been cryptographically mined and thus, from this aspect, is valid. The nonce is the cryptographically secure mining proof-of-work that proves beyond reasonable doubt that a particular amount of computation has been expended in the determination of this token value. (Yellowpager, 11.5. Mining Proof-of-Work).


difficulty A scalar value corresponding to the difficulty level applied during the nonce discovering of this block. It defines the mining Target, which can be calculated from the previous block’s difficulty level and the timestamp. The higher the difficulty, the statistically more calculations a Miner must perform to discover a valid block. This value is used to control the Block generation time of a Blockchain, keeping the Block generation frequency within a target range. On the test network, we keep this value low to avoid waiting during tests, since the discovery of a valid Block is required to execute a transaction on the Blockchain.


alloc Allows defining a list of pre-filled wallets. That’s an Ethereum specific functionality to handle the “Ether pre-sale” period. Since we can mine local Ether quickly, we don’t use this option.


coinbase The 160-bit address to which all rewards (in Ether) collected from the successful mining of this block have been transferred. They are a sum of the mining reward itself and the Contract transaction execution refunds. Often named “beneficiary” in the specifications, sometimes “etherbase” in the online documentation. This can be anything in the Genesis Block since the value is set by the setting of the Miner when a new Block is created.


timestamp A scalar value equal to the reasonable output of Unix time() function at this block inception. This mechanism enforces a homeostasis in terms of the time between blocks. A smaller period between the last two blocks results in an increase in the difficulty level and thus additional computation required to find the next valid block. If the period is too large, the difficulty, and expected time to the next block, is reduced. The timestamp also allows verifying the order of block within the chain (Yellowpaper, 4.3.4. (43)).


parentHash The Keccak 256-bit hash of the entire parent block header (including its nonce and mixhash). Pointer to the parent block, thus effectively building the chain of blocks. In the case of the Genesis block, and only in this case, it’s 0.


extraData An optional free, but max. 32-byte long space to conserve smart things for ethernity. :)


gasLimit A scalar value equal to the current chain-wide limit of Gas expenditure per block. High in our case to avoid being limited by this threshold during tests. Note: this does not indicate that we should not pay attention to the Gas consumption of our Contracts.
然后我们需要有一个存放区块链数据的文件夹,命名data,文件夹data/与genesis.json最好在一个文件夹下,比如他们都在一个myblockchain/目录下,实际上我的并不在同一个目录,在同一个目录仅仅是方便管理。
geth --datadir=/data/ init genesis.json
-
–datadir指定data目录用来储存区块链数据
-
genesis.json就是用来初始化区块链的文件,是init 的参数
从geth –help可以看到参数的意义
     init                       Bootstrap and initialize a new genesis block
  --datadir "/root/.ethereum"  Data directory for the databases and keystore
geth客户端会根据genesis.json的文件内容,将创世区块写入的我们的区块链中,构建好我们的私有的区块链,当输出如下类似内容时说明创建成功

至此,我们的个人区块链创建成功,之后我们就可以在这条链上发我们自己的token了。
接下来我们开启我们的区块链网络进行测试
启动区块链网络
geth --identity "TestNode" --rpc --rpcport "8545" --datadir=/data0/eth-test --port "30303" --nodiscover console
节点名字设置成TestNode,允许HTTP-RPC访问,访问端口为8545,监听端口为30303,这样就建立好了一个ethereum的私有节点
但是新版本的geth默认禁止了HTTP通道解锁账户,需要添加参数–allow-insecure-unlock,变成
geth --identity "TestNode" --rpc --allow-insecure-unlock --rpcport "8545" --datadir=/data0/eth-test --port "30303" --nodiscover console
输出如下内容
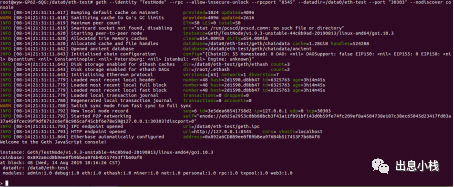
区块链网络启动成功。接下来我们测试启动的节点完成创建帐号,查看帐号,挖矿,转帐,查看余额,查看区块等等操作。
创建帐号
personal.newAccount()
终端提示输入密码,比如可以直接输入0等一些好记的密码,这里不需要用复杂的密码。

返回值可以看到帐号的地址和密钥的储存文件地址,这里请创建多个帐号以备之后的转账操作。
-
也可以直接输入
personal.newAccount(“***”) //引号内内容是设置的密码。
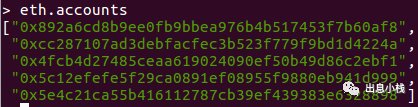
查看帐号
eth.accounts
会输出已创建帐号的地址
你可以直接查看文件内容找到账户的地址,使用tree 命令,如果没有请自行安装,sudo apt-get install tree .
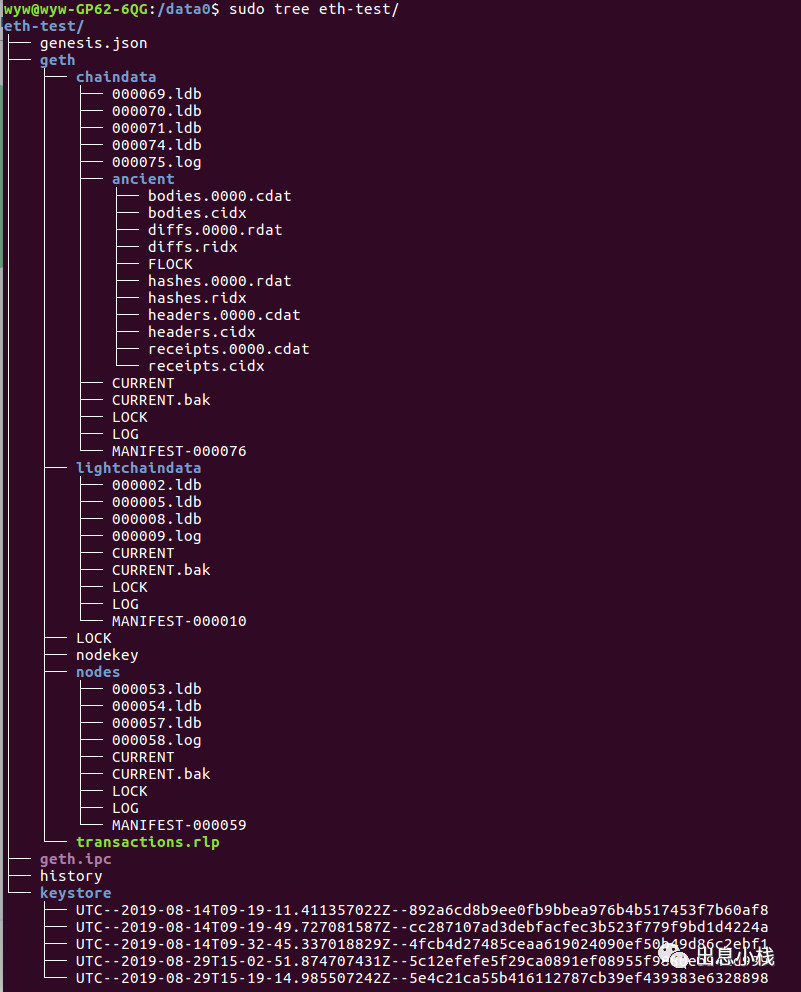
tree 后面参数是想要查看的文件名字,我们需要查看储存密钥的文件夹,本教程是储存在/data中,你需要在/目录下运行 sudo tree data/ ,输出内容可以看到在keystore下有你创建的所有的账户的密钥和地址。
获取账户的信息
eth.getBalance("0x4fcb4d27485ceaa619024090ef50b49d86c2ebf1")
引号内内容是想要查看账户的地址,会输出账户的资产数值,也可以设置参数为eth.accounts[ ],括号内是需要查看的账户的序号,第一个账户序号是0。
eth.getBalance(eth.accounts[2])
这里的账户资产应该是0。

挖矿
miner.start(1)
括号内的参数是线程数,数值越大出块越快,第一次启动挖矿会先生成挖矿所需的DAG文件,这个过程有点慢,需要等一会儿才会开始挖矿。

- 停止挖矿的命令为
miner.stop()
直接在挖矿的同一个终端同时输入命令就好,挖矿不影响命令的执行。挖矿的奖励会直接给到coinbase的地址的账户,默认条件下会给到你的第一个账户。可以运行命令查看你的地一个账户的资产,会发现不再是0.
要想使挖矿奖励进入其他账户,通过miner.setEtherbase()将其他账户设置成coinbase即可。
miner.setEtherbase(eth.accounts[2])
这里把第三个账户设置成coinbase。

查看到coinbase已被修改。再次尝试挖矿,之后查看coinage.账户的资产。
发出交易
eth.sendTransaction({from:eth.accounts[0],to:eth.accounts[1],value:5})
命令的意思是从地一个账户发送5 wei的以太币给第二个账户,from是发出交易的地址,to是接受方,value是发送的交易额。

你会发现报错了,阅读内容是因为需要password或者解锁,我们需要去给发送方的账户解锁。
personal.unlockAccount(eth.accounts[3])
这里我解锁的是第四个账户,你需要解锁的是第一个账户,这里需要提醒的是大家一定要记住自己设置的密码和密钥,以防丢失。
解锁成功会返回true

然后就可以转账了

转账成功后查看接收方的账户余额还是0,是没有转账成功吗,不是是因为和没有记录到链上,我们需要挖矿。

挖矿只需要出一个块就够了,挖矿后我们发现,接收方账户的资产变成了5,成功收到了转账。
我们已经完成了使用geth客户端搭建地一个节点,并进行了一些链上的简单操作。下一篇我们将在私有节点上部署一个发布ERC20 token的智能合约。